Tutorials
Shortening a Zipper
Before we look at shortening a zipper, let us look at zippers in general:
Zipper Terms
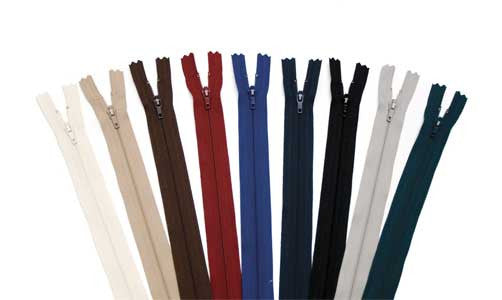
Coil Zipper - A more flexible and smoother running than molded teeth zipper. Use #5 for jackets and smaller sizes for other clothing. Use #10 for foul weather gear and heavy jackets. 4.5 or 5 for slip covers
Molded Teeth Zipper - Stronger and more abrasion resistant than coil zipper. However, molded teeth zipper is not as flexible as coil zipper. Use #5 for most clothing and slipcovers. Use #10 for boat canvas, sleeping bags and heavy jackets.
Tooth Size - The distance across the teeth or coils measured in millimeters (mm).
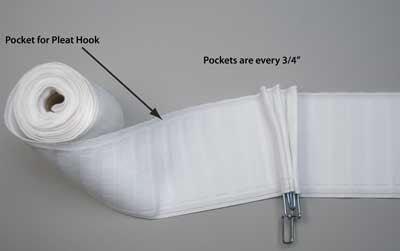
Continuous Zipper Tape - A length of zipper, either coil or tooth style, sold by the foot. Allows you to customize your own zippers. At least one end must be sewn closed. You cannot make a separating zipper with zipper tape.
Separating Zipper - Zippers that allow the two sides to come completely apart and easily place back together. Used in jackets and robes. Larger sizes are used on sailcovers, bimini tops and enclosures. Available in both coil and molded teeth. See diagram below, right.


Machine-Needle Know-How
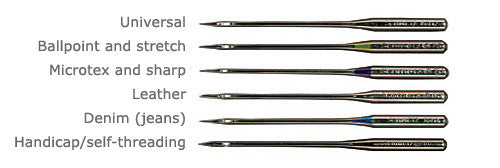
Here are lots of sewing machine needles to choose from. Insure a project’s success by selecting the right one.
by Lydia Morgan
Lay out an assortment of sewing-machine needles in various types and sizes on a table, and most of us can’t tell the difference among them. But put the wrong needle in your machine, or use the wrong needle for your fabric and/or thread, and all heck breaks loose. You can damage your bobbin hook. Throw off the machine’s timing. Get puckered seams. Break or shred thread. Punch holes in your fabric, and, at the very least, produce an inferior stitch. Whatever your machine, even the latest computerized model, needle selection can make or break your stitch.
At one time, only one type of machine needle was available to home sewers. The sole choice involved was size. But today, home sewers can choose from a wide variety of needle types in their quest for trouble free sewing .
Several things can determine the type of needle to pick. The fabric you’re using. The thread you’ve chosen (for example, metallic or embroidery). Or the type of stitch you plan (for instance, topstitching or hemstitching). When you’re doing regular, not decorative, sewing, the type of fabric determines the shape of the needle’s point. The fabric’s weight determines the needles’ size.
But before deciding on a needle, you first need to know the needle system your machine uses. Unlike commercial machines, which use a variety of needle systems, almost all home-sewing machines use a 130/705H needle system—designated on the needle case between the needle’s name and size (other letters indicate needle type, such as M for Microtex or Q for quilting). Your machine’s needle system never changes, regardless of the size or type of needle you use.
Tension control, stitch length, foot pressure, and other invisible settings on automatic machines are set for medium weight fabrics, threads, and needles. If you’re a middle of the road sewer, using midweight, woven fabrics, you could be happy using a size 12 universal needle for the rest of your life. But when you want improved stitch quality, learn which specific needles to use for various jobs. See "Anatomy of a needle" on p. 59 to understand the build of this tiny, but important tool.
Select needle type by the task at hand
Sewing machine manufacturers want their machines to consistently produce a perfect stitch. So the needle’s configuration is engineered to manage thread and fabric to reduce the likelihood of skipped or flawed stitches. Each needle type produces a stitch by using a uniquely designed groove, scarf, eye, and/or point to enable the needle and bobbin hook to meet perfectly. The chart of needle types above describes their uses, configuration, and how to troubleshoot them.
Choose regular needle size by fabric weight
When selecting a needle for regular sewing, start with needle size. European needles range in size from 60 to 120, which refers to the diameter taken on the shaft right above the eye. American needles are sized from 8 to 19 in an arbitrary numbering system. They are paired with corresponding European sizes.Ffor example, 60/8 or 70/10; the larger the number, the larger the needle.
Determine needle size by fabric weight. Choose a size 60/8 needle for lightweight fabrics similar to georgette or organdy. A 70/10 or 80/12 needle for medium-weight jersey, Lycra, linen, or calf leather; a 90/14 and 100/16 for heavy fabrics like jeans, vinyl, upholstery or canvas. A 110/18 or 120/19 for very heavy fabrics. After choosing needle size, match the needle point to your fabric. The needle type and name is usually determined by the characteristics of the needle’s point.
Thread should pass easily through eye of needle
How smoothly the thread pulls though the needle’s eye is also a factor in producing even, regular stitches. So if you have trouble threading the needle and problems with the stitches, the thread and needle aren’t matched correctly. Lay your thread in the needle’s front groove. It should "snuggle" in.
In the end, most sewers just want to get professional looking results. Knowing more about needles brings you closer to that goal. Needle choice greatly affects your outcome. For every correctly chosen, new needle you put into your machine, you should have eight to 12 continuous hours of trouble-free sewing.
Anatomy of a Needle
The key features of a standard machine needle are called out below. Their configuration varies from needle type to type (see the chart on pp. 60-61).
Shank
Top of needle that inserts into machine; most often has round front and flat back, which seats needle in right position.
Shaft
Body of needle below shank. Shaft thickness determines needle size.
Front groove
Slit above needle eye, should be large enough to "cradle" thread for smooth stitches.
Point
Needle tip that penetrates fabric to pass thread to bobbin-hook and form stitch. Shape of point varies among needle types.
Scarf
Indentation at back of needle. A long scarf helps eliminate skipped stitches by allowing bobbin hook to loop thread more easily. A shorter scarf requires a more perfectly timed machine.
Eye
Hole in end of needle through which thread passes. Needle size and type determine size and shape of eye.
How is a stitch formed?
The formation of a stitch begins when the needle penetrates the fabric and descends to its lowest point.
The bobbin hook then slides by the needle’s scarf, catching the upper thread, and carries it around the bobbin and bobbin thread.
The thread is then pulled up into the fabric, completing the stitch.
Standard Needles
The configuration of these needles is based on the particular fabric to be sewn.
Uses: Safest needle choice for most fabrics.
Configuration: Has slightly rounded point and elongated scarf to enable almost foolproof meeting of needle and bobbin hook.
Troubleshooting: When fabric is not medium-weight woven, consider needle specifically suited to fabric. For example, size 18 universal needle works on heavy denim, but size 18 jeans needle works better.
Uses: Ballpoint needle for heavier, looser sweater knits; stretch needle for highly elastic fabrics, like Spandex, or Lycra.
Configuration: Both have rounded points that penetrate between fabric threads rather than pierce them. (Stretch-needle point is slightly less rounded than ballpoint.)
Troubleshooting: Test-stitch knits with ballpoint, stretch, and universal needles to see which doesn’t cut yarn and yields best results. If ballpoint skips stitches, try stretch needle.
Uses: Sewing microfiber, silk, synthetic leather; precisely stitching edges; and heirloom sewing.
Configuration: Has an acute point.
Troubleshooting: Essentially trouble-free, but fabric may require a Teflon, roller, or even/dual-feed presser foot.
Uses: Excellent for sewing natural leather.
Configuration: Has slight cutting point (almost like an arrowhead).
Troubleshooting: On synthetic leather, unless it’s very heavy synthetic, cuts rather than pierces stitch hole and can tear leather. Most synthetic leathers require Microtex or sharp needle.
Uses: For heavyweight denim, duck, canvas, upholstery fabrics, artificial leather, and vinyl.
Configuration: Has deeper scarf, acute point, and modified shaft to sew without pushing fabric down into needle-plate hole. Goes through fabric and meets bobbin hook better on dense woven fabrics.
Troubleshooting: If stitches skip when sewing very heavy fabrics, try larger needle and sew more slowly or walk needle through fabric (by turning hand crank).
Handicap/self-threading needle
Uses: Enables easier threading for sewers with vision problems.
Configuration: Universal needle with slip-in threading slot at the eye.
Troubleshooting: Always pull sewn piece back away from needle before cutting thread so needle doesn’t unthread. Needle works well on woven fabrics, but may occasionally snag knits, so test-sew to check for fabric and needle compatibility.
Decorative Needles
The configuration is designed to wed thread to fabric for surface embellishment.
Uses: Topstitching.
Configuration: Has extra-acute point, extra-large eye, and large groove for heavy thread.
Troubleshooting: Use smallest size sewing machine needle that accommodates your thread to avoid punching large holes in fabric.
Uses: Machine embroidering or embellishing with decorative thread.
Configuration: Has light point (neither sharp nor ballpoint) and enlarged eye to keep
decorative threads from shredding or breaking, and prevent skipped stitches.
Troubleshooting: If thread still shreds on dense or heavily stitched design, use larger size needle or Metallica needle.
Metallic (Metafil and Metallica) needle
Uses: Sewing with decorative metallic threads.
Configuration: Has universal or standard point; large, elongated eye; and large groove to allow fragile metallic and synthetic filament threads to flow smoothly.
Troubleshooting: Metallic threads are very sensitive to problems in machine: Tiniest burr on thread path or needle can cause problems.
Uses: Piecing, quilting, and stippling.
Configuration: Has special tapered shaft to prevent damaging fabrics when stitching multiple layers.
Troubleshooting: Move fabric smoothly without pulling on needle when free-motion stitching to prevent breaking needle.
Special-purpose needles
These sewing machine needles are used only with front to back threading machines with zigzag features. Make sure your throat plate needle hole is wide enough to accommodate needle’s width. The zigzag width function is set at zero to prevent sideways movement.
Uses: Hemstitching or heirloom embroidery on linen and batiste.
Configuration: Has fins on sides of shank to create holes as you sew.
Troubleshooting: Stitch is more effective when needle returns to same needle hole more than once. If needle pushes fabric into needle hole, put stabilizer under fabric.
Uses: Topstitching, pin tucking, and decorative stitching.
Configuration: Two needles on single shaft produce two rows of stitches. Measurement between needles ranges from 1.6mm to 6mm. Needles come with universal, stretch, embroidery, denim, and Metallica points.
Troubleshooting: Be sure throat plate allows for distance between needles.
Uses: Same uses as for double needle.
Configuration: Cross bar on single shaft connects three needles to sew three stitching
rows. Comes with universal point in 2.5mm and 3mm widths.
Troubleshooting: Same as for double needle.
Uses: Free-motion stitching with dropped feed dogs.
Configuration: Has wire spring above point to prevent fabrics from riding up onto needle,
eliminating need for presser foot.
Troubleshooting: Before using, practice free-motion stitching with heavy regular sewing machine needle, paper, and dropped feed dogs. Don’t pull paper/fabric; instead gently guide it through stitching
To see the Pictures that Accompanied this Article, Click on Threads Pictures.
Making Floor Cloths
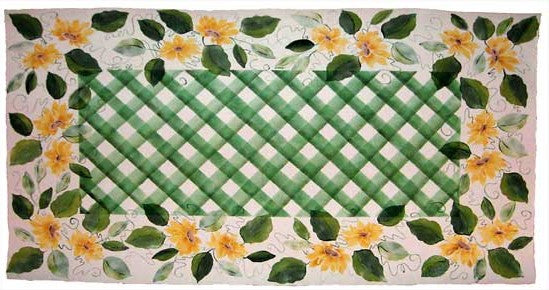
Painted Canvas Floor Cloths has been a part of Home Dec. since the 1700’s. The material for floor cloths is not as expensive as carpeting and the design choice is limited only by the imagination of the painter. A floor cloth is a way to have something uniquely "you" in your home decors.
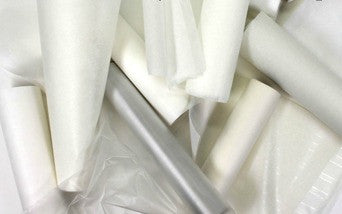
Floor Cloths are made from Midwest Numbered 100% Cotton Duck. It is "natural" in color – off-white with a few brown specs scattered on the surface. This fabric is available in both "double fill" and "single fill". The double fill is a more stable fabric, more tightly woven and costs more than single fill. It is the fabric of choice for a floor cloth. (Single fill is good for tote bags.) It basically the same fabric that is used to make Artist’s Canvas and takes paint quite easily.
The fabric is called numbered duck because each weight of fabric has a number associated with it that indicates the weight or ounces per yard of the fabric. The smaller numbers indicate heavier fabric. Number 10, (14.73 oz/yd) is the lightest weight fabric that can be used for floor cloths. Number 8, (18.00 oz/yd) is probably the most popular. Some people use number 6 (21.27 oz/yd). Number 4 (24.54 oz/yd) is about like working with plywood.
"How wide can I get it?" This is the number one question from potential floor cloth makers. In number 10, the fabric is made as wide as 144 inches. The big problem for a fabric store is how to store, handle and cut 144 inch wide fabric for customers. So, in general, 144-inch wide goods are not available to the consumer, unless you want to buy a full 100-yard roll, which weighs about 160 pounds. Seventy-two inches is usually the maximum width that can be supplied in cut yardage.
Beacon Fabric & Notions stocks #10, 60" wide and #6, 72" wide. Other widths and weights are available, please contact Customer Service.
An alternative to the numbered duck is Primed Artist’s Canvas. It is a little lighter in weight than the #10 cotton duck. It saves you a step, in that it already has the flat white paint that we speak of below, applied to one surface. It makes the job faster and easier. Most of the time I use the Artist’s Canvas. However, due to the lightweight of the fabric, unless the floor cloth is being placed on carpet, you will probably have to put some sort of anti-skid on the bottom, like Performix Supergrip.
Other than the fabric you will need:
Flat white latex acrylic paint
A good quality paint brush, made for latex paints, no wider than 2"
Sandpaper, between somewhere around 150 to 220 grit.
Masking Tape
Tape Measure
Upholstery Scissors (or at least a good sharp pair!)
Acrylic Artist Paint
Various bristle and foam brushes
Clear acrylic coating for finish coat
Carpenter’s Square
Soft lead pencils (sharp)
Optional items would include graph paper, stencils, French curves, razor-blade knife, straight edge and whatever else you need to be creative.
Cut a piece of duck about two inches bigger than the finished size of your floorcloth. Cut ½ inch long slits roughly ½ inch apart on the sides. This will allow the duck to lay flat.
Apply three to five coats of flat white latex paint. Let it dry in accordance with the manufacturer’s instructions and sand lightly between coats. Sand the final coat, very lightly. Transfer your design to the duck, using a soft lead pencil.
Apply the base (background color) coat of acrylic craft or artist’s paint to the entire surface of the canvas, including the "slit" edges. Now is the time to get creative. You can achieve many different looks by the way that you apply this paint. You can use bristle brushes, foam brushes, sponges, fingers, whatever. But, don’t put the paint on so thick that you can’t see the pencil lines you drew.
When the base coat is dry, apply masking tape to seal off areas to be painted other colors. If you got carried away with the base coat, you might have to re-draw some of your pencil lines. You can also use stencils. Apply all the paint needed for your design.
When your design is complete, apply three to four coats of a clear acrylic coating. Depending on the look you want to achieve, you can either use a flat (matte) or a more glossy coating. After the last coat is thoroughly dry, apply a coat to the underside to make it water repellant.
Lastly, trim your floorcloth to size, using a razor-blade knife and a metal straight edge. The razor blade will very easily cut into the surface. Hence, I recommend doing this on a wood surface that you are not concerned with how it looks.
Floorcloths are fun to make and are a nice gift. You would be surprised what price they will bring at a bazaar or fleamarket.
Selecting the Right Embroidery Stabilizer
There are many backings sold today for use in machine embroidery to stabilize your fabric while sewing designs. Whether doing free motion embroidery or programmed stitching, the end product can be improved when embroidery stabilizers are used. These stabilizers often will give embroidery a better finished look. Embroidery Stabilizer prevents puckering and bunching of stitches.
Embroidery Stabilizers can be permanent or temporary. Permanent backings are normally cut around after sewing the design. They are made to be washed with the garment. Temporary backings are removed after the design is done.
Temporary Embroidery Stabilizers, for Machine & Hand Embroidery.
Tear-Away Embroidery Stabilizers
Tear-Away is available in several weights. It can be used in single or double layers. It is recommended for use with medium to heavy weight fabrics. Used for densely stitched embroidery designs. After completing the design, it can be torn away in either the horizontal or vertical direction. It should be removed carefully in order to not disturb the stitches in your design. It is not recommended for delicate fabrics or sweaters. It is available in Black and White.
Iron-On Tear-Away.
This stabilizer is excellent for medium to heavyweight knit fabric. For best results when ironing on, be sure to avoid stretching the knit.
Adhesive-Backed Tear-Away.
Place Adhesive-Backed Tear-Away in your hoop. Peel away protective paper. Then lay the fabric to be embroidered over the hoop. Smooth in place. Great for small collar areas, velvets, napped fabrics and embroidering on patch blanks and baby bibs.
Soluble Stabilizer.
Use this stabilizer for delicate, washable fabric. Use for a high pile fabric such as terry. It is a gelatin sheet that dissolves in warm water. For a terry fabric, place stabilizer top and bottom and place in hoop. For a finished design, use embroidery thread as the bobbin thread.
Heat-Away® Stabilizer.
Use this stabilizer for fabrics that can tolerate heat but can not be washed. Also good fordesigns not dense enough for Tear-Away
Tear-Away/Wash-Away Stabilizer.
This Tear-Away has un.
Permanent Stabilizers, for Machine and Hand Embroidery.
Cut-Away Stabilizers.
Cut-Away is used by professionals and is meant to remain with the garment. It washes well and is excellent for jobs where the embroidery stabilizer comes in contact with the skin, such as golf shirts or sweaters.
Poly-Mesh Cutaway.
Woven stabilizer especially designed for extra stability on lightweight fabrics and knits. Unlike regular Cut-Aways this semitransparent poly-mesh will not show through white garments.
Fusible Cut-Away.
This iron-on Cut-Away stabilizer is soft, lightweight and launders well. Used when designs on knits and unstable stretchy fabrics call for a permanent stabilizer.
To decide which backing to use, you need to evaluate the following:
- The type of fabric.
- The density of the stitches.
- The weight of the fabric.
- The embroidery design itself.
The following are suggestions, if you are unfamiliar with stabilizers or are just beginning with machine embroidery or embellishment.
- Collect several fabrics that you enjoy using.
- Look at our selection of embroidery stabilizers. See Embroidery Stabilizers . Or, click on Embroidery Supplies, on the left side of this page.
- Select a closed or close stitched design and an open design to be used with each fabric and stabilizer.
- Use the stabilizer as directed on each sample piece (be sure to permanently mark the type of stabilizer used on each design).
- Make both designs on each fabric piece with each type stabilizer.
- Now launder the different types of fabrics and usual. If washing and drying will be included, launder the items several times.
After using the various stabilizers, you will have a better idea, based on fabric type, which embroidery stabilizer to use. This will, at least, give you a starting point when selecting the best stabilizer for a project.
For example, if you enjoy working with knits and have limited time, purchase an inexpensive knit top and embellish it with several items from your machines embroidery card. Use a different stabilizer on each design. On one design, use one layer of TearAway. The next two layers. Then one with heavy Tear Away and one with temporary adhesive backed Tear Away. Do the last with CutAway. Keep a diagram of what was used and where; then wear the garment.
After a number of washings you will determine which stabilizer works best on your knit garment. If any puckering occurs when washed, a quick press on the remaining designs will alleviate it.
To see our Embroidery Thread go to Embroidery Thread
Using Roller Shade Kits
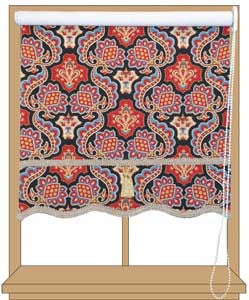
Directions for Easy Soft Shades using Roller Shade Kits
Width up to 48” wide, length 9 feet or less and fabric weight up to 8 lbs.
Materials Needed to make your shade.
Your Decorative Fabric- Purchase fabric at least 2 inches wider and 9 inches longer than finished shade.
Iron-On Lining, Shade Fabric, 54” Wide. Purchase same amount as your Decorative Fabric (item number 040044)
Roller Shade Clutch Kit (item number 210231)
Optional Decorative Trim—Gimp or Fringe
Tools required for assembly.
Steam Iron
Rotary Cutter
Rotary Cutting Pad and ruler
Tools to install fittings to window
Instructions for using the kit.
Set up Roller Shade Kit as directed in instructions included with Kit. Cut your decorative fabric pieces two inches wider and at least 9 inches longer than finished shade. Cut the Iron- On Lining shade Fabric 1 inch narrower than decorative fabric. Place the shiny side of lining shade fabric (bonding side) to the wrong side of your decorative fabric and using a steam iron, working from center out, bond fabric to fabric being sure edges of fabric are bonded good and that there are no bubbles. (see photo A). Square off and mark the finished width and length of your fabric as indicated in the Roller Kit instructions. Using a Rotary Cutter or scissor, cut a clean edge along your marked line (see photos B and C). Finish the lower edge as desired. Straight with a pocket, for use with wooden piece included with the kit. You could scallop the bottom or finish with any decorative trim, you want! Remove double stick tape from the tube, in the kit. Lay upper edge of fabric along this line and stick in place (see photo D). Follow directions for installing shade fittings onto bar (see photo E and F) and installing window mounting brackets given with shade kit to your window frame. Place shade in window fitting. Your shade is finished!


Hints for Working with Heavier Thread on Home Sewing Machines
LOOK OVER SECTION ON MACHINE MAINTENANCE
LOOK OVER SECTION ON SETTING TENSIONS CLEAN BOBBIN AREA- (FREE OF LINT) OIL MACHINE (as directed in your machine instruction manual)
MAKE SURE THREAD TENSIONS ARE GOOD WITH A THREAD AND FABRIC THAT YOU NORMALLY USE. INSERT A #18 JEANS NEEDLE (best needle for heavy fabric) WIND A BOBBIN WITH V 69 OR V 46 THREAD AND INSERT AS USUAL INTO YOUR MACHINE. THREAD YOUR MACHINE AS DIRECTED IN YOUR MANUAL WITH THE HEAVIER THREAD. Note: V 69 is the heaviest thread that will fit into a home sewing machine and is usually used for Boat Canvas. V 46 is a little lighter.
IF YOU HAVE AN EVEN FEED FOOT, ROLLER FOOT OR TEFLON FOOT INSTALL IT. There will be less slippage of the fabric with one of these feet.
Normally, any foot will work if you do not have any of the above.
Adjust your stitch length to wider stitch. I normally set it to a basting length stitch. PLACE A SCRAP OF FABRIC YOU WANT TO WORK WITH UNDER PRESSER FOOT. CHANGE STITCH LENGTH TO THE LONGEST STITCH ON YOUR MACHINE MAKE YOUR STITCH BY MANUALLY TURNING THE WHEEL. IF YOU MEET RESISTANCE STOP AND TIGHTEN YOUR UPPER TENSION CONTINUE TO TIGHTEN THE UPPER TENSION UNTIL YOU DO NOT MEET RESISTANCE. THEN MAKE FIVE TO SIX STITCHES MANUALLY AND REMOVE FROM MACHINE AND CHECK THE STITCH BALANCE. (Your machine manual will normally show you what a well-balanced stitch should look like.) IF STILL NOT BALANCED TRY TIGHTENING OR LOOSENING UPPER TENSION. Most times it needs to be tightened slightly.
Many times the best stitches a home machines will have are a nice stitch on the top and a slight loop on the bottom. Check to see if the stitch holds a seam well. If it does, it will still work to stitch heavier fabric. I try to do all my adjusting by only changing the upper tension leaving the bobbin tension alone. I have three different home sewing machines and they all need the tension adjusted with heavier thread. Two of the machines I tighten the upper tension all the way, on the other machine, which has a self-adjusting tension, I tighten less.
The Ins & Outs of Outdoor Fabrics
Fabrics
Selecting the right fabric for your project will depend on what you are making, the look you want to achieve and the which part of the country you live in. Outdoor fabrics are also useful for backpacks, tote bags and other accessories. In general, outdoor fabric will cost more than clothing fabric - for good reason - it has to stand up to the weather!
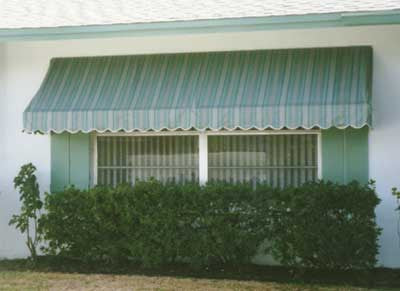
Sunbrella®, manufactured by Glen Raven Mills, is the most common Awning and Marine canvas. It is a solution-dyed woven acrylic canvas. It is available in over 40 colors. This fabric is highly water-resistant but not waterproof. It is among the easiest to sew of the outdoor fabrics. It is not particularly abrasion resistant. Wear points have to be reinforced with a vinyl. Sunbrella will last for many years out in the weather.After about four years, renew the water resistance with Aquatite. For more information about Sunbrella visit Glen Raven's Website
Another popular fabric is Denim-Backed Vinyl. It is a gray denim fabric laminated with an off-white vinyl. Like any vinyl fabric, it is waterproff. The vinyl is the side exposed to the weather. This fabric does not have the longevity of Sunbrella, but is less expensive. It is very abrasion resistant. To extend the life of the fabric, spray the vinyl side with 303 Protective Spray.
Vinyl Laminates are a two ply fabric. Two layers of vinyl are laminated over a scrim of polyester thread. The top and bottom can be different colors. White or off-white is usually the outside color and light blue or a tan the inside color. The usual application for vinyl laminates is for Awnings. The boating applications include Bimini tops or Dodgers. To extend the life of these fabrics, spray the side exposed to the Sun with 303 Protective Spray.
Pfifertex®; also known as Vinyl Coated Mesh is an upholstery fabric for outdoor furniture. It can be thought of as "fiberglass window screen dipped in vinyl". Available in a variety of colors, it is used to make slip covers along with closed cell foam or polyester batting for outdoor cushions. It makes an excellent see-through bag. We made the perfect mesh bag to stow the anchor and anchor rope on our boat...the water drains right out! It is also used as a windscreen, for partial wind blockage. Because vinyl-coated mesh blocks 50% of the light, another application is for partial light blockage. For boats or RV's it is often used as a windshield or window cover, to decrease the amount of light coming through.
Clear Vinyls are primarily used for enclosures for screened-in patios or porches.For boats, it is used to enclose the cockpit or fly bridge area. It is sold either by the yard or in sheets. The sheet glass is more optically clear and more expensive. The 20 gauge will make a great see through pocket book. Use Novus for cleaning and scratch removal.
Boat Shrunk Canvas and Poly/Cotton Canvas can be left outdoors in the cooler regions of the world. They are water repellent and mildew resistant. They are excellent cover fabrics. A good rule of thumb: If the boating season in your part of the country runs from Memorial Day to Labor Day, these fabrics will work o.k. for you and save you some money. But, they don't last long in the South.
Our Chair and Seat Vinyls are marine grade and have some resistance to the weather. However, they may not be left in the weather permanently.(303 Protective Spray will greatly extend the life of any vinyl exposed to Sunlight.) Upholstery grade Vinyls have a very short lifespan in marine service.
Nylon fabrics: Oxford, Packcloth and Cordura®, along with our Cotton Duck, make great tote bags, backpacks and soft luggage. These are easy to sew for a beginner project. To see all of our Outdoor and Marine fabrics, go to Outdoor Fabrics.
Thread
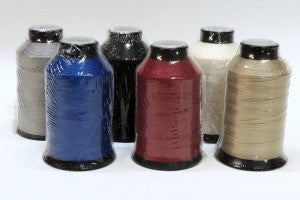
Sewing canvas and other outdoor fabrics requires heavy thread. For sewing Canvas on a home sewing machine, we recommend V 69. This is the heaviest thread that can be used on most home machines. If you have access to a commercial sewing machine you can use V 92, which is heavier.
We have v 69 in one ounce spools (aprox 300 yd) in a variety of colors. We have v 69 in four ounce and one pound spools in black and white.
Needles
To use the heavier threads, like V 69 you will need to use a larger needle. We recommend you use a #18 Jeans Needles